I have a new item in my etsy shop. It is a reversible Mincraft Creeper / Enderman fleece hat! Click here to go to my etsy shop.
Monday, November 4, 2013
Friday, November 1, 2013
Halloween Costumes 2013
This year I made two costumes. One, a Captain Crunch hat for my friend and the other a ninja costume for my son.
First, the hat. This thing is huge! I used a foam core board and satin heavy duty satin. The inner workings of how it is put on is with a headband. I added wire in the middle for extra support.
Next up is my son's ninja costume! He chose the blue accent color.
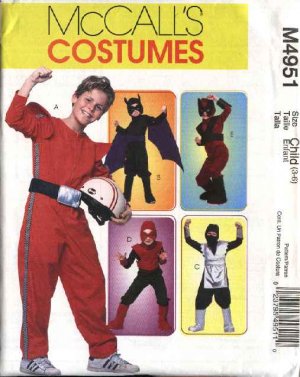
I used this pattern (view C):
I did some alterations to the pattern. I added some elastic sewn into the neckline at the back because the neck was large and bulging. I also added some hook and loop fastener to the shoulders of the body suit to attach the vest to the bodysuit. Otherwise it was falling off the shoulders.
First, the hat. This thing is huge! I used a foam core board and satin heavy duty satin. The inner workings of how it is put on is with a headband. I added wire in the middle for extra support.
Next up is my son's ninja costume! He chose the blue accent color.
I used this pattern (view C):
Thursday, October 3, 2013
T Shirt Patterns
I love to make holiday shirts for my little guy. I just finished his up the other day and thought I would share my patterns! My son is 8 and in a size 8/10. If you are making smaller shirts, print the patterns at between 50% and 80% to achieve the smaller size.
| Sew the tree trunk and then the tree pieces from bottom to top |
| Pin the circle for the spider body. Pin ribbon pieces on and under the body. Sew around circle. Sew legs on. Hot glue googly eyes on. |
Saturday, September 21, 2013
Knitting / Crochet Bag
I was asked to make a bag for someone to carry around their knitting items.
I didn't take pictures at every step, but I will walk you through it!
I started with a dinner plate. Yep, the bottom circle shape is my largest dinner plate that I traced out onto the outer and the lining fabric. I also cut out two circles of liner padding.
Next, I measured the circumference of the circle (the total inches all the way around). I cut out my fabric in that length and the desired height (mine is about 20 inches tall). Cut out the same in liner fabric. I cut my liner fabric about 5 inches taller so it would overlap at the top to get a nice crisp border. Also cut out two padding pieces to create a nice shape.
Measure how tall you want your pockets to be. I made them 2/3 the height. Cut twice the amount you need so you can fold it over to create really sturdy pockets.
Cut out some handles and padding for them.
Put the right sides together and stitch around, leaving an opening to pull right side out. Since I had the excess at the top of the lining, it created a nice overlap. Stitch the opening closed. Top stitch close to where the liner fabric and the outer fabric meet for added strength.
| This is what I came up with. A round bottom bag that has multiple pockets around the inside (some are very small in order to accommodate needles easily) |
I started with a dinner plate. Yep, the bottom circle shape is my largest dinner plate that I traced out onto the outer and the lining fabric. I also cut out two circles of liner padding.
Next, I measured the circumference of the circle (the total inches all the way around). I cut out my fabric in that length and the desired height (mine is about 20 inches tall). Cut out the same in liner fabric. I cut my liner fabric about 5 inches taller so it would overlap at the top to get a nice crisp border. Also cut out two padding pieces to create a nice shape.
Measure how tall you want your pockets to be. I made them 2/3 the height. Cut twice the amount you need so you can fold it over to create really sturdy pockets.
Cut out some handles and padding for them.
| Sew the handles into a tube, turn right side out and top stitch along the edges. |
Put the right sides together and stitch around, leaving an opening to pull right side out. Since I had the excess at the top of the lining, it created a nice overlap. Stitch the opening closed. Top stitch close to where the liner fabric and the outer fabric meet for added strength.
| Don't forget to add your personal tag! |
| I sewed an X on each handle where it attaches to give it extra strength. |
| Now you have a lovely bag! |
| With lots of room to tote your projects around |
Friday, September 20, 2013
Wine Bottle Bag
This project comes from the book "Fabric-by-Fabric One-Yard Wonders"
The image in the bottom left corner of the cover is actually the project I made: wine bottle bags. It comfortably holds 6 wine bottles with some room for a corkscrew and other small odds and ends. It is a fairly easy project that doesn't take too long.
| Here you can see the 'pockets' |
Picnic Basket Redo
I found a wonderful picnic basket at goodwill the other day. It had a liner that had seen better days. I took out the liner and cut it up into a pattern. Then I sewed my new liner. I have it attached to the basket with ribbons tied together.
I love how it turned out!
Dr Who inspired curtains
Subscribe to:
Posts (Atom)